가. 최근 보안 동향
- 최근 생성형 AI(*)인 클로드(*)를 활용한 해킹 공격 및 방어 사례가 증가하고 있다.
*생성형 AI(Generative AI, Gen AI): 기존 데이터를 학습하여 새로운 데이터(예: 글, 이미지, 음성 등)를 생성할 수 있는 인공지능 기술이다.
*클로드(Claude): 앤트로픽(Anthropic)에서 개발한 생성형 AI로, 프로그래밍(코딩)에 특화되어 있다.
Disrupting the first reported AI-orchestrated cyber espionage campaign
A report describing an a highly sophisticated AI-led cyberattack
www.anthropic.com
- 클로드를 보안도구(예: Burp Suite, Nmap)와 연동하면 웹 서비스 취약점, 네트워크 스캔을 자동으로 수행하고 결과를 보고서 형태로 제공받을 수 있다.
AI를 활용한 SQL Injection 공격 방법(SQLMap+Claude+MCP)
가. 최근 보안 동향- 최근 생성형 AI(*)인 클로드(*)를 활용한 해킹 공격 및 방어 사례가 증가하고 있다.*생성형 AI(Generative AI, Gen AI): 기존 데이터를 학습하여 새로운 데이터(예: 글, 이미지, 음성 등
hagsig.tistory.com
- Wireshark(*)는 네트워크 패킷을 실시간으로 캡처하고 분석할 수 있는 오픈소스 네트워크 프로토콜 분석 도구로, AI와 연동하여 사용하면 단독으로 사용했을 때보다 패킷 분석 및 이상 징후 탐지 과정이 자동화되고, 추가 행위(예: 특정 프로토콜 필터링, 통신 패턴 분석, 보안 위협 식별 등)도 효율적으로 지시할 수 있어 네트워크 문제 해결의 신속성과 보안 분석의 정밀성을 크게 향상한다.
*와이어샤크(Wireshark): 네트워크 상에서 전송되는 데이터 패킷을 실시간으로 캡처하고, 다양한 네트워크 프로토콜(HTTP, TCP, UDP, DNS 등)을 계층별로 상세하게 분석하여 네트워크 트래픽의 흐름과 내용을 시각적으로 확인할 수 있는 오픈소스 네트워크 분석 도구이다.
- 아래의 설치 가이드를 참고하여 클로드를 활용한 네트워크 패킷 분석 방법을 학습해 보자.
나. AI를 활용한 네트워크 패킷 분석 환경 구축
1. Wireshark 설치
- 아래의 사이트에 접속하여 Wireshark를 다운로드 및 설치한다.
Wireshark • Go Deep
Wireshark: The world's most popular network protocol analyzer
www.wireshark.org
2. Python 및 MCP 서버 설치
2-1. Python 설치
- SQLMap MCP Server(*) 설치를 위해서는 파이썬 3.8 이상의 버전을 설치하여야 한다. 아래의 게시글을 참고하여 파이썬을 설치한다.
* MCP(Model Context Protocol): 생성형 AI가 긴 대화나 복잡한 내용을 더 잘 기억하고 처리할 수 있도록 도와주는 기술이다.
[파이썬 강의] - 0.1 파이썬 개발 환경 구축
가. 윈도우즈에서 파이썬 개발 1. 설치 파일 다운로드 아래의 링크를 클릭해 파이썬 공식 다운로드 페이지로 이동한다. Download Python The official home of the Python Programming Language www.python.org 가장 높은
hagsig.tistory.com
2-2. Wireshark MCP Server 설치
- Wireshark mcp server 실행에 필요한 파이썬 패키지를 아래의 명령어를 이용하여 설치한다.
pip install mcp pyshark
- wireshark-mcp-server 이름의 폴더를 생성한다.
mkdir C:\\Users\\hagsig\\wireshark-mcp-server
- 생성한 폴더에 wireshark-mcp-server.py 파일을 생성하고 아래의 내용을 추가하거나, 파일을 다운로드한다.
※ Wireshark 설치 시 기본경로로 설치하지 않았을 경우 아래의 소스코드에서 경로를 수정해주어야 한다.
import asyncio
import sys
from mcp.server.models import InitializationOptions
from mcp.server import NotificationOptions, Server
from mcp.server.stdio import stdio_server
from mcp.types import Tool, TextContent
import json
import subprocess
import os

# MCP 서버 생성
server = Server("wireshark-mcp")

# TShark 경로 찾기
def find_tshark_path():
    """TShark 실행 파일 경로를 찾습니다"""
    # 일반적인 Wireshark 설치 경로들
    possible_paths = [
        r"C:\Program Files\Wireshark\tshark.exe",
        r"C:\Program Files (x86)\Wireshark\tshark.exe",
    ]

    for path in possible_paths:
        if os.path.exists(path):
            return path

    # PATH에서 찾기 시도
    try:
        result = subprocess.run(
            ["where", "tshark"],
            capture_output=True,
            text=True,
            shell=True
        )
        if result.returncode == 0 and result.stdout.strip():
            return result.stdout.strip().split('\n')[0]
    except:
        pass

    return None

TSHARK_PATH = find_tshark_path()

def run_tshark_command(command):
    """TShark 명령을 실행하고 결과를 반환"""
    if not TSHARK_PATH:
        return None, "TShark를 찾을 수 없습니다. Wireshark가 설치되어 있는지 확인해주세요."

    # tshark를 전체 경로로 교체
    command = command.replace('tshark', f'"{TSHARK_PATH}"')

    try:
        result = subprocess.run(
            command,
            capture_output=True,
            text=True,
            encoding='utf-8',
            errors='replace',
            shell=True
        )
        return result.stdout, result.stderr
    except Exception as e:
        return None, str(e)

def analyze_pcap_with_tshark(filepath: str, packet_count: int = 100):
    """TShark를 사용하여 PCAP 파일 분석"""
    if not TSHARK_PATH:
        return [{"error": "TShark를 찾을 수 없습니다. Wireshark를 설치해주세요.", "tshark_path": TSHARK_PATH}]

    # TShark 명령: 주요 필드 추출
    command = f'tshark -r "{filepath}" -T json -c {packet_count}'

    stdout, stderr = run_tshark_command(command)

    if not stdout:
        return [{"error": f"패킷을 읽을 수 없습니다: {stderr}", "tshark_path": TSHARK_PATH}]

    try:
        packets = json.loads(stdout)
        results = []

        for i, packet in enumerate(packets):
            packet_info = {
                "number": i + 1,
                "layers": {}
            }

            # 프레임 정보
            if "_source" in packet and "layers" in packet["_source"]:
                layers = packet["_source"]["layers"]

                # 기본 정보
                if "frame" in layers:
                    frame = layers["frame"]
                    packet_info["time"] = frame.get("frame.time", "N/A")
                    packet_info["length"] = frame.get("frame.len", "N/A")
                    packet_info["protocol"] = frame.get("frame.protocols", "N/A")

                # IP 정보
                if "ip" in layers:
                    ip = layers["ip"]
                    packet_info["source_ip"] = ip.get("ip.src", "N/A")
                    packet_info["destination_ip"] = ip.get("ip.dst", "N/A")

                # TCP 정보
                if "tcp" in layers:
                    tcp = layers["tcp"]
                    packet_info["source_port"] = tcp.get("tcp.srcport", "N/A")
                    packet_info["destination_port"] = tcp.get("tcp.dstport", "N/A")
                    packet_info["tcp_flags"] = tcp.get("tcp.flags", "N/A")

                # UDP 정보
                if "udp" in layers:
                    udp = layers["udp"]
                    packet_info["source_port"] = udp.get("udp.srcport", "N/A")
                    packet_info["destination_port"] = udp.get("udp.dstport", "N/A")

                # HTTP 정보
                if "http" in layers:
                    http = layers["http"]
                    packet_info["http_method"] = http.get("http.request.method", "N/A")
                    packet_info["http_uri"] = http.get("http.request.uri", "N/A")
                    packet_info["http_host"] = http.get("http.host", "N/A")

                # DNS 정보
                if "dns" in layers:
                    dns = layers["dns"]
                    packet_info["dns_query"] = dns.get("dns.qry.name", "N/A")

            results.append(packet_info)

        return results
    except json.JSONDecodeError as e:
        return [{"error": f"JSON 파싱 오류: {str(e)}"}]
    except Exception as e:
        return [{"error": f"분석 오류: {str(e)}"}]

def filter_packets_with_tshark(filepath: str, filter_rule: str, packet_count: int = 50):
    """TShark를 사용하여 패킷 필터링"""
    command = f'tshark -r "{filepath}" -Y "{filter_rule}" -T json -c {packet_count}'

    stdout, stderr = run_tshark_command(command)

    if not stdout:
        return [{"error": f"필터링 실패: {stderr}"}]

    try:
        packets = json.loads(stdout)
        results = []

        for i, packet in enumerate(packets):
            if "_source" in packet and "layers" in packet["_source"]:
                layers = packet["_source"]["layers"]
                protocol = layers.get("frame", {}).get("frame.protocols", "N/A")

                results.append({
                    "number": i + 1,
                    "protocol": protocol,
                    "summary": str(packet)[:200]
                })

        return results
    except Exception as e:
        return [{"error": f"필터링 오류: {str(e)}"}]

def get_statistics_with_tshark(filepath: str):
    """TShark를 사용하여 통계 수집"""
    # 전체 패킷 수
    command_count = f'tshark -r "{filepath}" -q -z io,stat,0'
    stdout_count, _ = run_tshark_command(command_count)

    # 프로토콜 계층 통계
    command_protocol = f'tshark -r "{filepath}" -q -z io,phs'
    stdout_protocol, _ = run_tshark_command(command_protocol)

    # 통신 쌍 통계
    command_conv = f'tshark -r "{filepath}" -q -z conv,ip'
    stdout_conv, _ = run_tshark_command(command_conv)

    return {
        "packet_count_info": stdout_count if stdout_count else "N/A",
        "protocol_hierarchy": stdout_protocol if stdout_protocol else "N/A",
        "ip_conversations": stdout_conv if stdout_conv else "N/A"
    }

def extract_http_requests(filepath: str):
    """HTTP 요청 URL을 추출합니다"""
    command = f'tshark -r "{filepath}" -Y "http.request" -T fields -e http.request.method -e http.request.uri -e http.host'

    stdout, stderr = run_tshark_command(command)

    if not stdout:
        return [{"error": f"HTTP 요청을 추출할 수 없습니다: {stderr}"}]

    results = []
    lines = stdout.strip().split('\n')
    for i, line in enumerate(lines):
        if line.strip():
            parts = line.split('\t')
            if len(parts) >= 1:
                results.append({
                    "number": i + 1,
                    "method": parts[0] if len(parts) > 0 else "N/A",
                    "uri": parts[1] if len(parts) > 1 else "N/A",
                    "host": parts[2] if len(parts) > 2 else "N/A"
                })

    return results

# 도구 목록 정의
@server.list_tools()
async def handle_list_tools() -> list[Tool]:
    """사용 가능한 도구 목록을 반환합니다"""
    return [
        Tool(
            name="analyze_pcap",
            description="PCAP 파일을 분석하여 패킷 정보를 반환합니다",
            inputSchema={
                "type": "object",
                "properties": {
                    "filepath": {
                        "type": "string",
                        "description": "분석할 PCAP 파일의 경로"
                    },
                    "packet_count": {
                        "type": "integer",
                        "description": "분석할 패킷 수 (기본값: 100)",
                        "default": 100
                    }
                },
                "required": ["filepath"]
            }
        ),
        Tool(
            name="filter_packets",
            description="Wireshark 디스플레이 필터를 사용하여 패킷을 필터링합니다",
            inputSchema={
                "type": "object",
                "properties": {
                    "filepath": {
                        "type": "string",
                        "description": "PCAP 파일 경로"
                    },
                    "filter_rule": {
                        "type": "string",
                        "description": "Wireshark 디스플레이 필터 (예: 'http', 'tcp.port==80')"
                    },
                    "packet_count": {
                        "type": "integer",
                        "description": "반환할 패킷 수",
                        "default": 50
                    }
                },
                "required": ["filepath", "filter_rule"]
            }
        ),
        Tool(
            name="get_packet_statistics",
            description="PCAP 파일의 통계 정보를 반환합니다",
            inputSchema={
                "type": "object",
                "properties": {
                    "filepath": {
                        "type": "string",
                        "description": "PCAP 파일 경로"
                    }
                },
                "required": ["filepath"]
            }
        ),
        Tool(
            name="extract_http_requests",
            description="HTTP 요청 URL을 추출합니다",
            inputSchema={
                "type": "object",
                "properties": {
                    "filepath": {
                        "type": "string",
                        "description": "PCAP 파일 경로"
                    }
                },
                "required": ["filepath"]
            }
        )
    ]

# 도구 호출 처리
@server.call_tool()
async def handle_call_tool(name: str, arguments: dict) -> list[TextContent]:
    """도구 호출을 처리합니다"""

    try:
        if name == "analyze_pcap":
            filepath = arguments["filepath"]
            packet_count = arguments.get("packet_count", 100)

            results = analyze_pcap_with_tshark(filepath, packet_count)

            return [TextContent(
                type="text",
                text=json.dumps(results, indent=2, ensure_ascii=False)
            )]

        elif name == "filter_packets":
            filepath = arguments["filepath"]
            filter_rule = arguments["filter_rule"]
            packet_count = arguments.get("packet_count", 50)

            results = filter_packets_with_tshark(filepath, filter_rule, packet_count)

            return [TextContent(
                type="text",
                text=json.dumps(results, indent=2, ensure_ascii=False)
            )]

        elif name == "get_packet_statistics":
            filepath = arguments["filepath"]

            stats = get_statistics_with_tshark(filepath)

            return [TextContent(
                type="text",
                text=json.dumps(stats, indent=2, ensure_ascii=False)
            )]

        elif name == "extract_http_requests":
            filepath = arguments["filepath"]

            results = extract_http_requests(filepath)

            return [TextContent(
                type="text",
                text=json.dumps(results, indent=2, ensure_ascii=False)
            )]

        else:
            return [TextContent(
                type="text",
                text=f"알 수 없는 도구: {name}"
            )]

    except Exception as e:
        return [TextContent(
            type="text",
            text=f"오류 발생: {str(e)}"
        )]

async def main():
    """MCP 서버를 실행합니다"""
    async with stdio_server() as (read_stream, write_stream):
        await server.run(
            read_stream,
            write_stream,
            InitializationOptions(
                server_name="wireshark",
                server_version="0.1.0",
                capabilities=server.get_capabilities(
                    notification_options=NotificationOptions(),
                    experimental_capabilities={}
                )
            )
        )

if __name__ == "__main__":
    asyncio.run(main())
3. 클로드 설치 및 설정파일 수정
3-1. 클로드 데스크톱 설치
- 아래의 사이트에 접속하여 클로드 데스크톱 버전을 설치한다.
Download Claude
Download Claude for your desktop or mobile device.
www.claude.com
3-2. 클로드 설정파일 수정
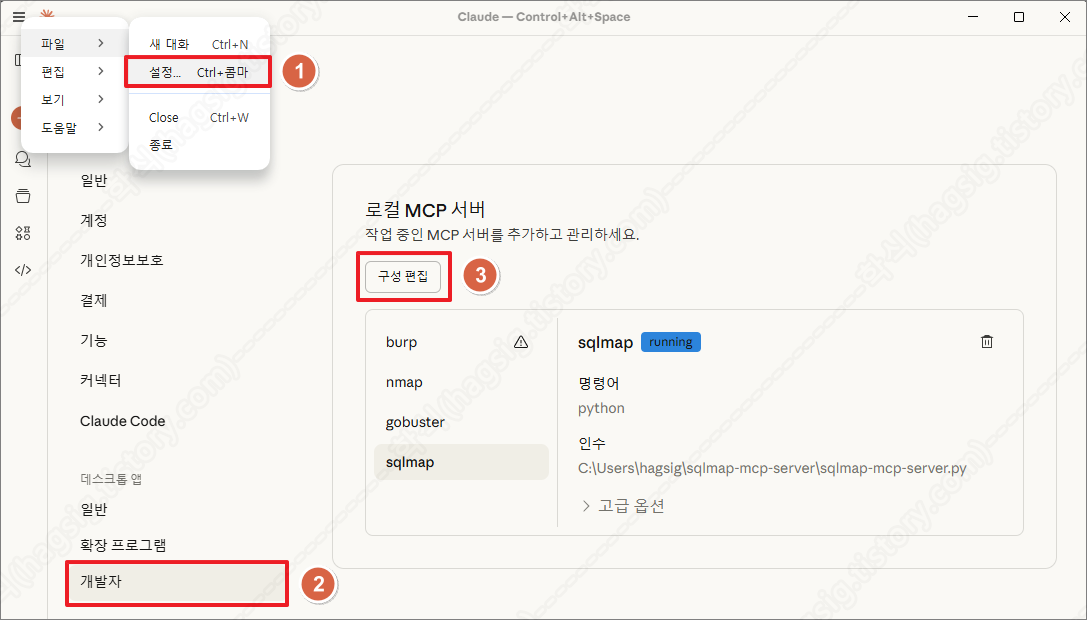
- 클로드 데스크톱에서 MCP 서버를 사용하기 위해서는 claude_desktop_config.json 설정 파일의 수정이 필요하다.
- 파일 → 설정 → 개발자 → 구성편집 → claude_desktop_config.json 편집
참고. 운영체제(OS) 별 claude_desktop_config.json 파일의 경로는 아래와 같다.
# 운영체제(OS)별 claude_desktop_config.json 파일 경로

# macOS
~/Library/Application Support/Claude/claude_desktop_config.json

# Windows
%APPDATA%\Claude\claude_desktop_config.json

# Linux
~/.config/Claude/claude_desktop_config.jsonCopy
- claude_desktop_config.json 설정 파일에 아래의 내용을 추가한다.
- 만약 wireshark-mcp-server.py 경로가 아래의 설정과 다르다면 코드를 변경해야 한다.
{
    "mcpServers": {
        "sqlmap": {
            "command": "python",
            "args": [
                "C:\\Users\\hagsig\\wireshark-mcp-server\\wireshark-mcp-server.py"
            ],
            "env": {
                "PYTHONUNBUFFERED": "1"
            }
        }
    }
}
※ 만약 다른 MCP 서버와의 연결을 위해 추가된 내용이 있을 경우 아래와 같이 내용을 추가한다.
{
    "mcpServers": {
        "burp": {
            "command": "c:\\users\\hagsig\\appdata\\local\\programs\\burpsuitecommunity\\jre\\bin\\java.exe",
            "args": [
                "-jar",
                "C:\\Users\\hagsig\\AppData\\Roaming\\BurpSuite\\mcp-proxy\\mcp-proxy-all.jar",
                "--sse-url",
                "http://127.0.0.1:9876"
            ]
        },
        "sqlmap": {
            "command": "python",
            "args": [
                "C:\\Users\\hagsig\\wireshark-mcp-server\\wireshark-mcp-server.py"
            ],
            "env": {
                "PYTHONUNBUFFERED": "1"
            }
        }
    }
}
4. 클로드와 Wireshark MCP Server 연동 확인
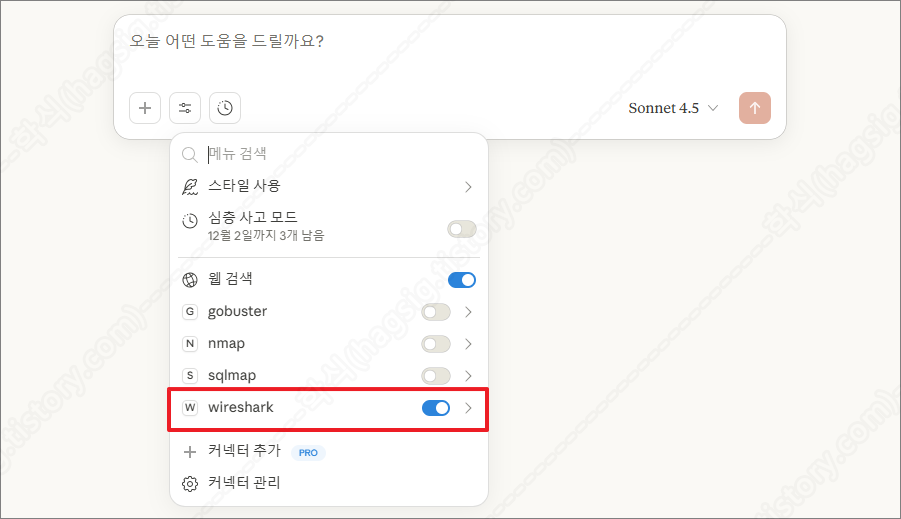
- 클로드를 종료하고 재 실행한 뒤, 아래의 사진과 같이 사용자 프롬프트에 wireshark라는 옵션이 생겼는지 확인한다.
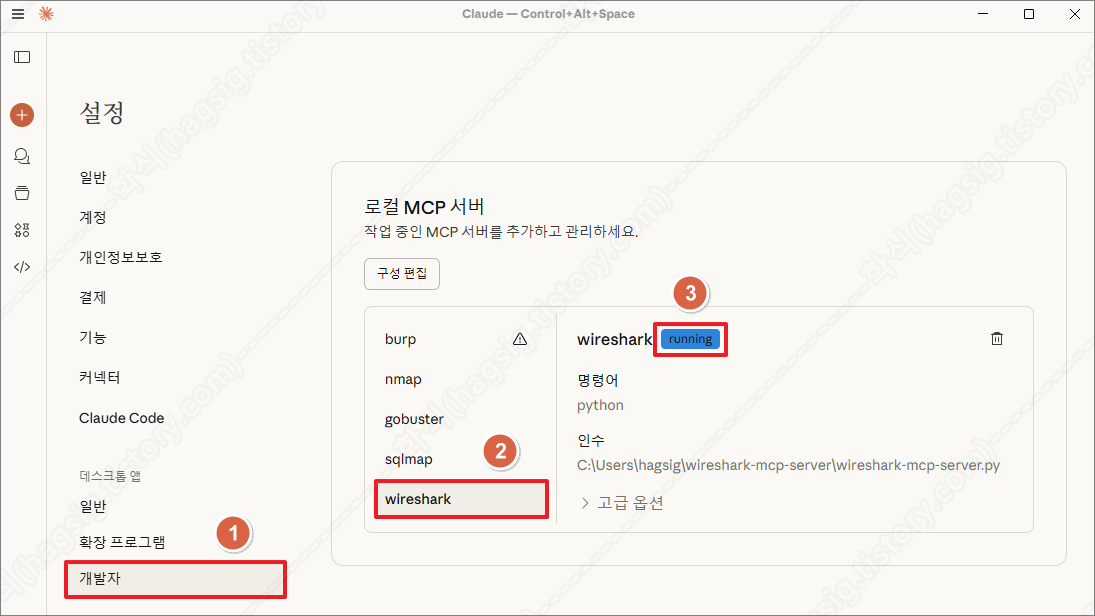
- 설정의 개발자 메뉴에서 아래의 사진과 같이 running이라고 표시되는지 확인한다.
- 위 두 가지가 모두 확인된다면 Wireshark MCP Server가 정상 동작하고 있고, 클로드와 연동이 성공한 것이다.
다. AI를 활용한 네트워크 패킷 분석 수행
1. 점검 옵션
- 현재는 아래의 사진과 같이 wireshark-mcp-server.py 파일에 작성한 세 가지의 기능만 제공하고 있다.
- 추가적으로 원하는 기능은 클로드에 물어보고, 답변받은 소스코드를 wireshark-mcp-server.py 파일에 추가하면 된다.
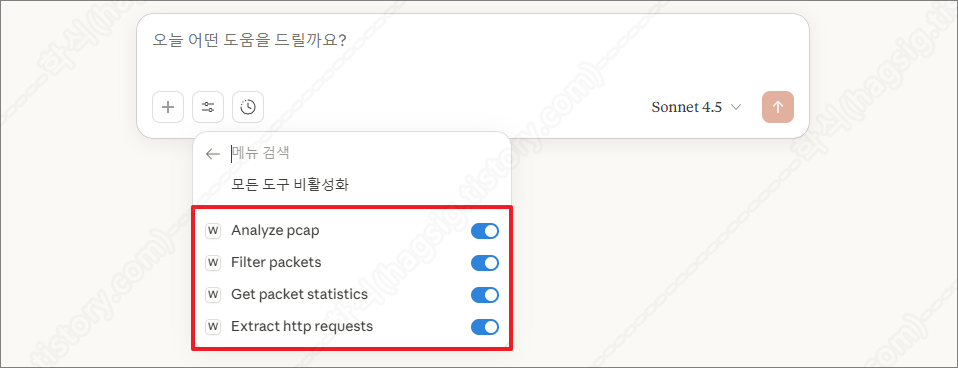
- 클로드 Wireshark 옵션(도구)
| 옵션(도구) | 설명 |
| Analyze PCAP | PCAP(네트워크 트래픽 캡처 파일) 파일의 전체적인 패킷 정보를 읽어서 보여준다. |
| Filter Packets | 특정 조건에 맞는 패킷만 골라서 보여준다. |
| Get Packet Statistics | 캡처 파일의 전체 통계와 요약 정보를 제공한다. |
| Extract http requests | PCAP 파일에서 HTTP 요청의 핵심 정보만 추출하는 기능이다. |
2. 점검 예시
- 클로드 데스크톱은. pcapng 확장자를 지원하지 않기 때문에, 파일을 첨부할 수 없다.
- 아래와 같이 분석해야 하는 파일이 존재하는 경로를 지정하여 명령하여야 오류 없이 분석이 가능하다.
"C:\Users\hagsig\testpacket.pcapng" 파일을 분석하여 어떤 공격이 들어왔는지 알려줘.
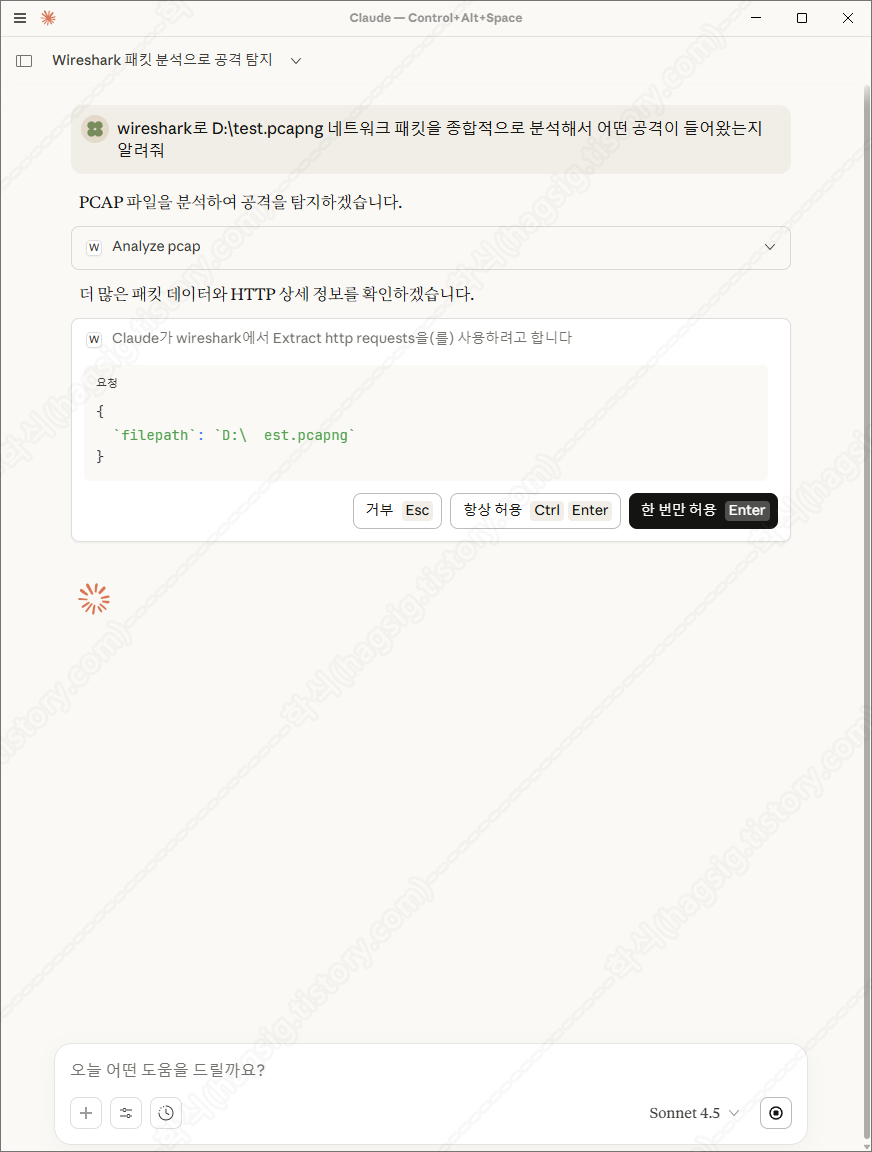
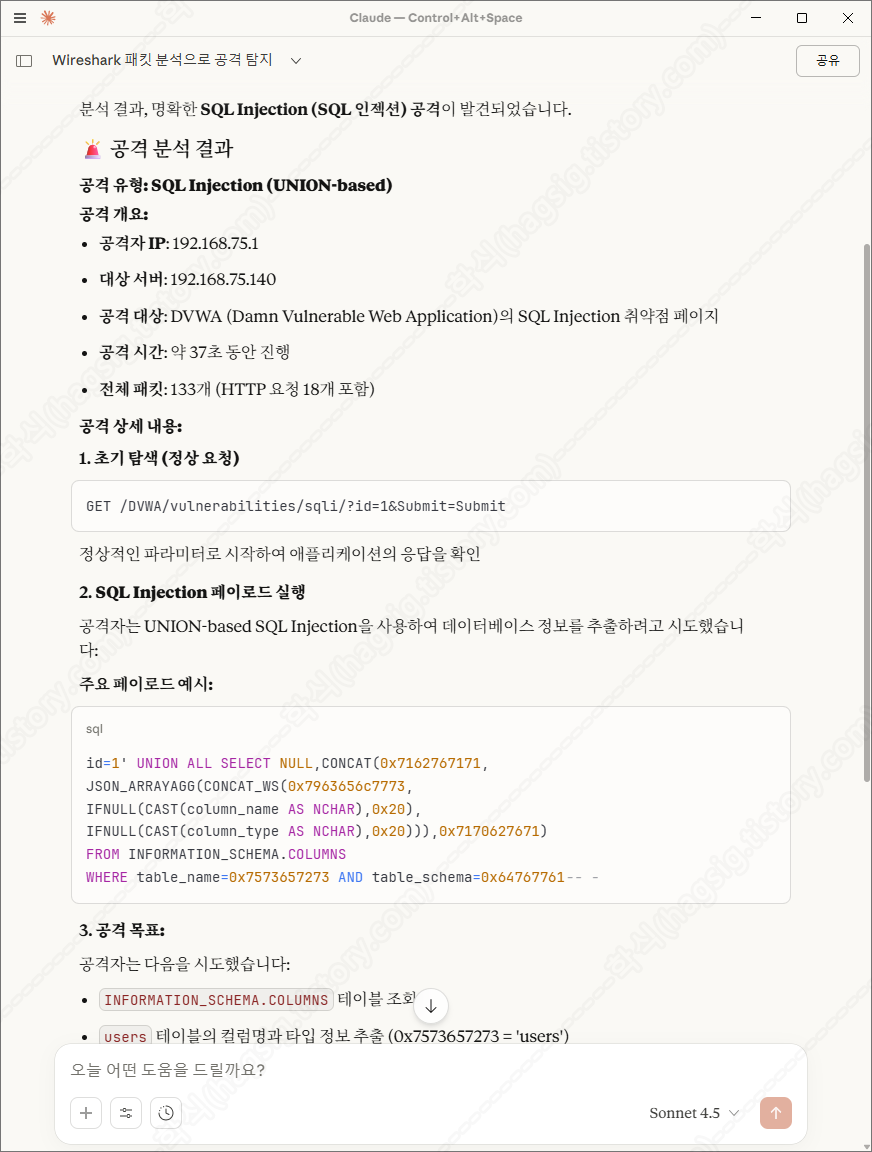
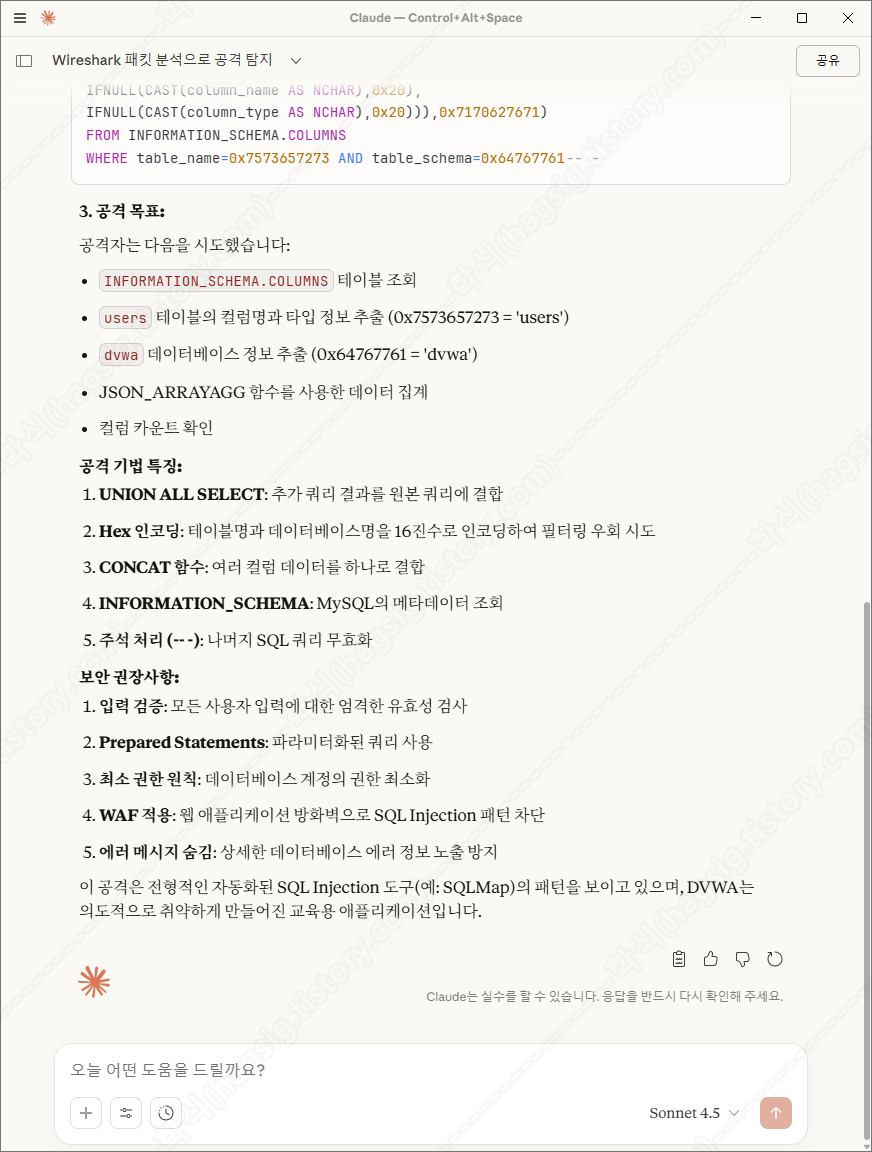
- 아래는 샘플 .pcapng 파일을 분석하라고 지시하였을 때의 동작과정 및 응답이다.
- 각 과정별로 사용자에게 동의를 구하고 작업을 수행하는 것을 볼 수 있다.
'AI 취약점진단 · 모의해킹' 카테고리의 다른 글
| AI를 활용한 SQL Injection 공격 방법(SQLMap+Claude+MCP) (0) | 2025.11.21 |
|---|---|
| AI를 활용한 하위 디렉터리/서브도메인 스캔(Gobuster+Claude+MCP) (0) | 2025.11.21 |
| AI를 활용한 네트워크 스캔 방법(Nmap+Claude+MCP) (0) | 2025.11.20 |
| AI를 이용한 웹 모의해킹 방법(BurpSuite+Claude+MCP) (0) | 2025.11.18 |
| '25 OWASP LLM03: Supply Chain 공격 유형 (0) | 2025.11.11 |