가. 최근 보안 동향
- 최근 생성형 AI(*)인 클로드(*)를 활용한 해킹 공격 및 방어 사례가 증가하고 있다.
*생성형 AI(Generative AI, Gen AI): 기존 데이터를 학습하여 새로운 데이터(예: 글, 이미지, 음성 등)를 생성할 수 있는 인공지능 기술이다.
*클로드(Claude): 앤트로픽(Anthropic)에서 개발한 생성형 AI로, 프로그래밍(코딩)에 특화되어 있다.
Disrupting the first reported AI-orchestrated cyber espionage campaign
A report describing an a highly sophisticated AI-led cyberattack
www.anthropic.com
- 클로드를 보안 도구(예: Burp Suite, Nmap)와 연동하면 웹 서비스 취약점, 네트워크 스캔을 자동으로 수행하고 결과를 보고서 형태로 제공받을 수 있다.
AI를 이용한 웹 모의해킹 방법(BurpSuite+Claude+MCP)
가. 용어 설명1. 생성형 AI 란?- 생성형 AI(Generative AI)는 기존 데이터를 학습하여 새로운 데이터(예: 글, 이미지, 음성 등)를 생성할 수 있는 인공지능 기술이다. 2. Claude 란?- 클로드(Claude)는 앤트로
hagsig.tistory.com
AI를 활용한 네트워크 스캔 방법(Nmap+Claude+MCP)
가. 최근 보안 동향- 최근 생성형 AI(*)인 클로드(*)를 활용한 해킹 공격 및 방어 사례가 증가하고 있다.*생성형 AI(Generative AI, Gen AI): 기존 데이터를 학습하여 새로운 데이터(예: 글, 이미지, 음성 등
hagsig.tistory.com
- Gobuster(*)는 도메인 구조 및 하위 디렉터리 탐지에 특화된 보안 도구로, AI와 연동하여 사용하면 단독으로 사용했을 때보다 점검 과정을 간편화할 수 있고, 추가 행위(예: 취약점 스캔)를 지시할 수 있어 효율성이 증가된다.
*고버스터(Gobuster): 웹 서버의 디렉터리나 서브도메인을 무차별대입공격(Brute Force)으로 찾아내는 보안 도구이다.
- 아래의 설치 가이드를 참고하여 클로드를 활용한 웹 서비스 하위 디렉터리 스캔 방법을 학습해 보자.
나. AI를 활용한 하위 디렉터리 스캔 환경 구축
1. Go 설치
- Gobuster를 사용하기 위해서는 Go 1.24(*) 버전이 설치되어 있어야 한다.
- 아래의 사이트에 접속하여 다운로드 및 설치한다.
*고퍼(Gopher, Go): 구글에서 개발한 프로그래밍 언어로 빠른 성능, 안정성, 편의성, 쉬운 프로그래밍을 목표로 설계되었다.
All releases - The Go Programming Language
go.dev
2. Node.js 설치
- Gobuster MCP Server를 설치하기 위해서는 npm(*)이 설치되어 있어야 한다.
- Windows 환경에서는 npm이 기본적으로 설치되어 있지 않으므로 아래의 사이트에 접속하여 Node.js(*)를 설치한다.
*npm: Node.js용 패키지(라이브러리)를 설치, 관리, 배포할 수 있게 해주는 패키지 매니저이다.
*Node.js: 자바스크립트를 브라우저 외부에서 실행할 수 있게 해주는 런타임 환경으로, 설치 시 npm을 사용할 수 있다.
Node.js — Node.js® 다운로드
Node.js® is a free, open-source, cross-platform JavaScript runtime environment that lets developers create servers, web apps, command line tools and scripts.
nodejs.org
3. Gobuster 및 MCP 서버 설치
2-1. Gobuster 설치
- Gobuster 설치를 위해 아래의 명령어를 입력한다.
# 운영체제(OS)별 Gobuster 설치 명령어

# macOS
brew install gobuster

# Linux
sudo apt install gobuster

# Windows or etc
go install github.com/OJ/gobuster/v3@latest
2-2. Wordlist 다운로드
- Gobuster는 워드리스트(Wordlist)를 이용하여 사전대입공격(*)을 통한 스캔을 수행하기 때문에 자주 사용되는 단어(문자)가 기록되어 있는 파일이 필요하다.
*사전대입공격(Dictionary Attack): 미리 준비된 단어 목록(사전)을 기반으로 하니씩 대입하여 맞는 것이 있는지 찾아내는 공격 방식이다.
- 아래의 사이트에 접속하여 Wordlist를 다운로드한다.
https://github.com/danielmiessler/SecLists/
GitHub - danielmiessler/SecLists: SecLists is the security tester's companion. It's a collection of multiple types of lists used
SecLists is the security tester's companion. It's a collection of multiple types of lists used during security assessments, collected in one place. List types include usernames, passwords, ...
github.com
- 해당 파일에는 실제 공격에 사용되는 웹쉘이 포함되어 있어 다운로드 시 차단, 백신에서 악성코드 탐지 알림이 발생할 수 있다.
- 본 글에서는 하위 디렉터리, 서브도메인 스캔에 사용할 파일만 필요하므로 찝찝한 분들은 아래의 첨부파일을 다운로드하길 바란다.
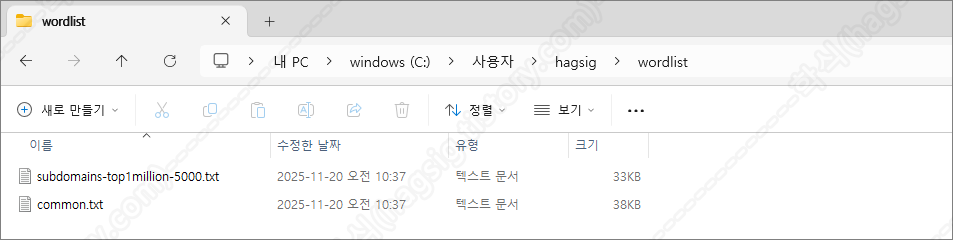
- wordlist를 보관할 폴더를 생성한다.
mkdir C:\\Users\\hagsig\\wordlist
- 다운로드 한 SecLists-master.zip 내에서 두 개의 파일만 위에서 생성한 폴더로 추출한다.
① subdomains-top1million-5000.txt 경로: SecLists-master.zip → /Discovery/DNS/subdomains-top1million-5000.txt
② common.txt 경로: SecLists-master.zip → Discovery/Web-Content/common.txt
2-3. Gobuster MCP Server 설치
- gobuster-mcp-server 이름의 폴더를 생성한다.
mkdir C:\\Users\\hagsig\\gobuster-mcp-server
- 아래의 명령어를 참고하여 Gobuster MCP Server를 설치한다.
# MCP 서버 경로로 이동
cd C:\\Users\\hagsig\\gobuster-mcp-server

# package.json 초기화
npm init -y

# GObuster MCP Server 설치
npm install @modelcontextprotocol/sdk
- 설치 후 gobuster-mcp-server 폴더에 아래와 같은 파일들이 생성되었다면 정상적으로 설치한 것이다.
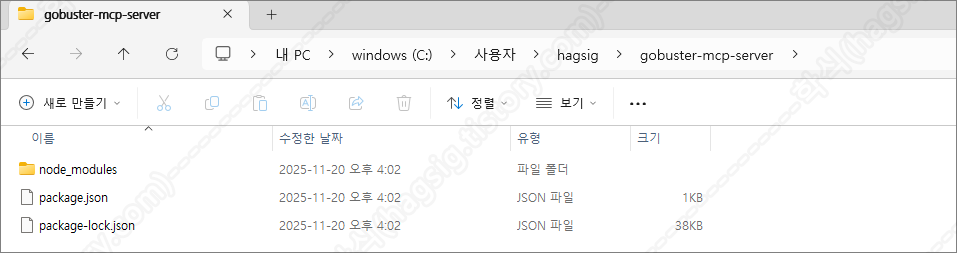
- gobuster-mcp-server 폴더에 생성된 package.json 파일을 아래와 같이 수정한다.
{
  "name": "gobuster-mcp-server",
  "version": "1.0.0",
  "type": "module",
  "description": "MCP server for Gobuster",
  "main": "index.js",
  "bin": {
    "gobuster-mcp-server": "./index.js"
  },
  "scripts": {
    "start": "node index.js"
  },
  "dependencies": {
    "@modelcontextprotocol/sdk": "^0.5.0"
  }
}
- gobuster-mcp-server 폴더에 index.js 파일을 생성하고 아래의 내용을 추가하거나, 파일을 다운로드한다.
※ 만약 wordlist 파일을 저자와 다른 경로에 저장하였다면, 저장한 경로로 소스코드를 수정하여야 한다.
import { Server } from "@modelcontextprotocol/sdk/server/index.js";
import { StdioServerTransport } from "@modelcontextprotocol/sdk/server/stdio.js";
import {
  CallToolRequestSchema,
  ListToolsRequestSchema,
} from "@modelcontextprotocol/sdk/types.js";
import { exec } from "child_process";
import { promisify } from "util";

const execAsync = promisify(exec);

const server = new Server(
  {
    name: "gobuster-mcp-server",
    version: "1.0.0",
  },
  {
    capabilities: {
      tools: {},
    },
  }
);

// 도구 목록 정의
server.setRequestHandler(ListToolsRequestSchema, async () => {
  return {
    tools: [
      {
        name: "gobuster_dir_scan",
        description: "웹 디렉토리/파일을 스캔합니다. 워드리스트를 사용하여 숨겨진 경로를 찾습니다.",
        inputSchema: {
          type: "object",
          properties: {
            url: {
              type: "string",
              description: "스캔할 대상 URL (예: https://example.com)",
            },
            wordlist: {
              type: "string",
              description: "워드리스트 파일 경로 (기본값: C:\\Users\\hagsig\\wordlist\\common.txt)",
              default: "C:\\Users\\hagsig\\wordlist\\common.txt",
            },
            extensions: {
              type: "string",
              description: "검색할 파일 확장자 (쉼표로 구분, 예: php,html,txt)",
              default: "",
            },
            threads: {
              type: "integer",
              description: "동시 실행 스레드 수 (기본값: 10)",
              default: 10,
            },
            timeout: {
              type: "string",
              description: "HTTP 타임아웃 (예: 10s)",
              default: "10s",
            },
            status_codes: {
              type: "string",
              description: "표시할 HTTP 상태 코드 (쉼표로 구분, 예: 200,204,301,302,307,401,403)",
              default: "200,204,301,302,307,401,403",
            },
          },
          required: ["url"],
        },
      },
      {
        name: "gobuster_dns_scan",
        description: "DNS 서브도메인을 스캔합니다.",
        inputSchema: {
          type: "object",
          properties: {
            domain: {
              type: "string",
              description: "스캔할 도메인 (예: example.com)",
            },
            wordlist: {
              type: "string",
              description: "워드리스트 파일 경로",
              default: "C:\\Users\\hagsig\\wordlist\\subdomains-top1million-5000.txt",
            },
            threads: {
              type: "integer",
              description: "동시 실행 스레드 수",
              default: 10,
            },
          },
          required: ["domain"],
        },
      },
      {
        name: "gobuster_vhost_scan",
        description: "가상 호스트를 스캔합니다.",
        inputSchema: {
          type: "object",
          properties: {
            url: {
              type: "string",
              description: "스캔할 대상 URL",
            },
            wordlist: {
              type: "string",
              description: "워드리스트 파일 경로",
              default: "C:\\Users\\hagsig\\wordlist\\common.txt",
            },
            threads: {
              type: "integer",
              description: "동시 실행 스레드 수",
              default: 10,
            },
          },
          required: ["url"],
        },
      },
    ],
  };
});

// 도구 실행 핸들러
server.setRequestHandler(CallToolRequestSchema, async (request) => {
  const { name, arguments: args } = request.params;

  try {
    if (name === "gobuster_dir_scan") {
      let command = `gobuster dir -u "${args.url}" -w "${args.wordlist || 'C:\\Users\\hagsig\\wordlist\\common.txt'}"`;

      if (args.extensions) {
        command += ` -x ${args.extensions}`;
      }

      command += ` -t ${args.threads || 10}`;
      command += ` --timeout ${args.timeout || '10s'}`;
      command += ` -b ""`; // status-codes-blacklist 비활성화
      command += ` -s "${args.status_codes || '200,204,301,302,307,401,403'}"`;
      command += ` --no-error`; // 에러 메시지 숨김

      const { stdout, stderr } = await execAsync(command, {
        maxBuffer: 10 * 1024 * 1024 // 10MB 버퍼
      });

      return {
        content: [
          {
            type: "text",
            text: `Gobuster 디렉토리 스캔 결과:\n\n${stdout}\n${stderr ? `\nErrors: ${stderr}` : ''}`,
          },
        ],
      };
    }

    if (name === "gobuster_dns_scan") {
      let command = `gobuster dns -d "${args.domain}" -w "${args.wordlist || 'C:\\Users\\hagsig\\wordlist\\subdomains-top1million-5000.txt'}"`;
      command += ` -t ${args.threads || 10}`;

      const { stdout, stderr } = await execAsync(command, {
        maxBuffer: 10 * 1024 * 1024
      });

      return {
        content: [
          {
            type: "text",
            text: `Gobuster DNS 스캔 결과:\n\n${stdout}\n${stderr ? `\nErrors: ${stderr}` : ''}`,
          },
        ],
      };
    }

    if (name === "gobuster_vhost_scan") {
      let command = `gobuster vhost -u "${args.url}" -w "${args.wordlist || 'C:\\Users\\hagsig\\wordlist\\common.txt'}"`;
      command += ` -t ${args.threads || 10}`;

      const { stdout, stderr } = await execAsync(command, {
        maxBuffer: 10 * 1024 * 1024
      });

      return {
        content: [
          {
            type: "text",
            text: `Gobuster VHost 스캔 결과:\n\n${stdout}\n${stderr ? `\nErrors: ${stderr}` : ''}`,
          },
        ],
      };
    }

    throw new Error(`Unknown tool: ${name}`);
  } catch (error) {
    return {
      content: [
        {
          type: "text",
          text: `Error: ${error.message}`,
        },
      ],
      isError: true,
    };
  }
});

async function main() {
  const transport = new StdioServerTransport();
  await server.connect(transport);
  console.error("Gobuster MCP Server running on stdio");
}

main();
3. 클로드 설치 및 설정파일 수정
3-1. 클로드 데스크톱 설치
- 아래의 사이트에 접속하여 클로드 데스크톱 버전을 설치한다.
Download Claude
Download Claude for your desktop or mobile device.
www.claude.com
3-2. 클로드 설정파일 수정
- 클로드 데스크톱에서 MCP 서버를 사용하기 위해서는 claude_desktop_config.json 설정 파일의 수정이 필요하다.
- 운영체제(OS) 별 claude_desktop_config.json 파일의 경로는 아래와 같다.
# 운영체제(OS)별 claude_desktop_config.json 파일 경로

# macOS
~/Library/Application Support/Claude/claude_desktop_config.json

# Windows
%APPDATA%\Claude\claude_desktop_config.json

# Linux
~/.config/Claude/claude_desktop_config.json
- claude_desktop_config.json 설정 파일에 아래의 내용을 추가한다.
{
    "mcpServers": {
        "gobuster": {
            "command": "node",
            "args": [
                "C:\\Users\\hagsig\\gobuster-mcp-server\\index.js"
            ]
        }
    }
}
※ 만약 다른 MCP 서버와의 연결을 위해 추가된 내용이 있을 경우 아래와 같이 내용을 추가한다.
{
    "mcpServers": {
        "burp": {
            "command": "c:\\users\\hagsig\\appdata\\local\\programs\\burpsuitecommunity\\jre\\bin\\java.exe",
            "args": [
                "-jar",
                "C:\\Users\\hagsig\\AppData\\Roaming\\BurpSuite\\mcp-proxy\\mcp-proxy-all.jar",
                "--sse-url",
                "http://127.0.0.1:9876"
            ]
        },
        "gobuster": {
            "command": "node",
            "args": [
                "C:\\Users\\hagsig\\gobuster-mcp-server\\index.js"
            ]
        }
    }
}
4. 클로드와 Nmap MCP 서버 연동 확인
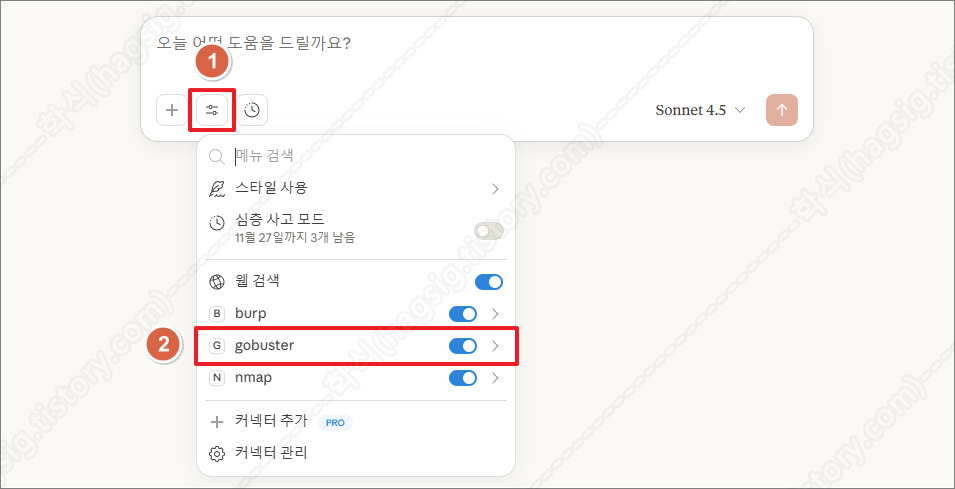
- 클로드를 종료하고 재 실행한 뒤, 아래의 사진과 같이 사용자 프롬프트에 gobuster이라는 옵션이 생겼는지 확인한다.
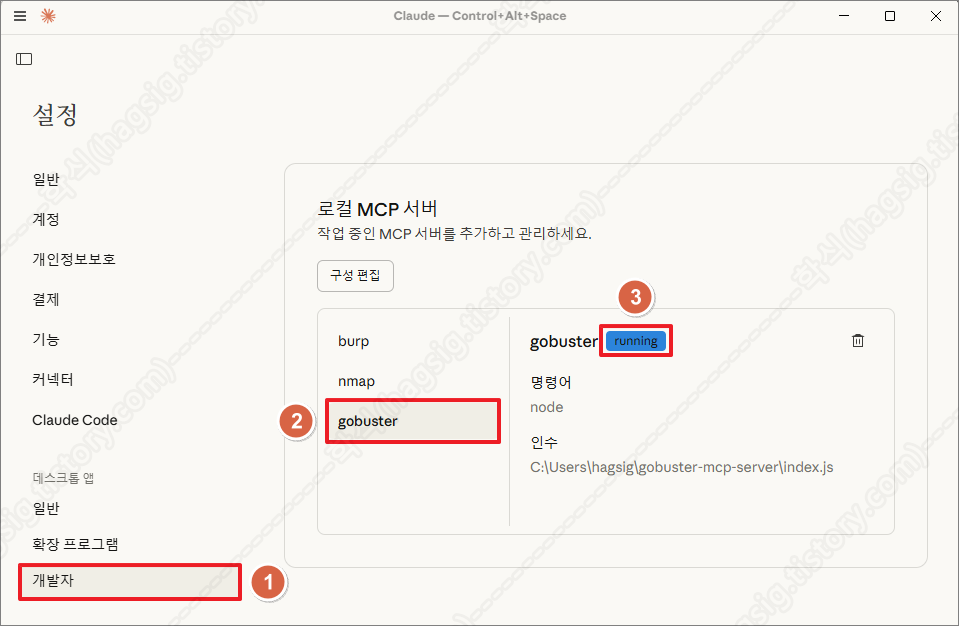
- 설정의 개발자 메뉴에서 아래의 사진과 같이 running이라고 표시되는지 확인한다.
- 위 두 가지가 모두 확인된다면 Gobuster MCP Server가 정상 동작하고 있고, 클로드와 연동이 성공한 것이다.
다. AI를 활용한 하위 디렉터리 스캔 수행
1. 점검 옵션
- 현재는 아래의 사진과 같이 index.js 파일에 작성한 세 가지의 기능만 제공하고 있다.
- 추가적으로 원하는 기능은 클로드에 물어보고, 답변받은 소스코드를 index.js 파일에 추가하면 된다.

- 클로드 Gobuster 옵션(도구)
| 옵션(도구) | 설명 |
| Gobuster dir scan | 웹 서버의 숨겨진 디렉토리와 파일을 찾아내는 기능이다. |
| Gobuster dns scan | 대상 도메인의 서브도메인을 찾아내는 기능이다. |
| Gobuster vhost scan | 동일한 IP 주소에서 호스팅되는 여러 가상 호스트를 찾아내는 기능이다. |
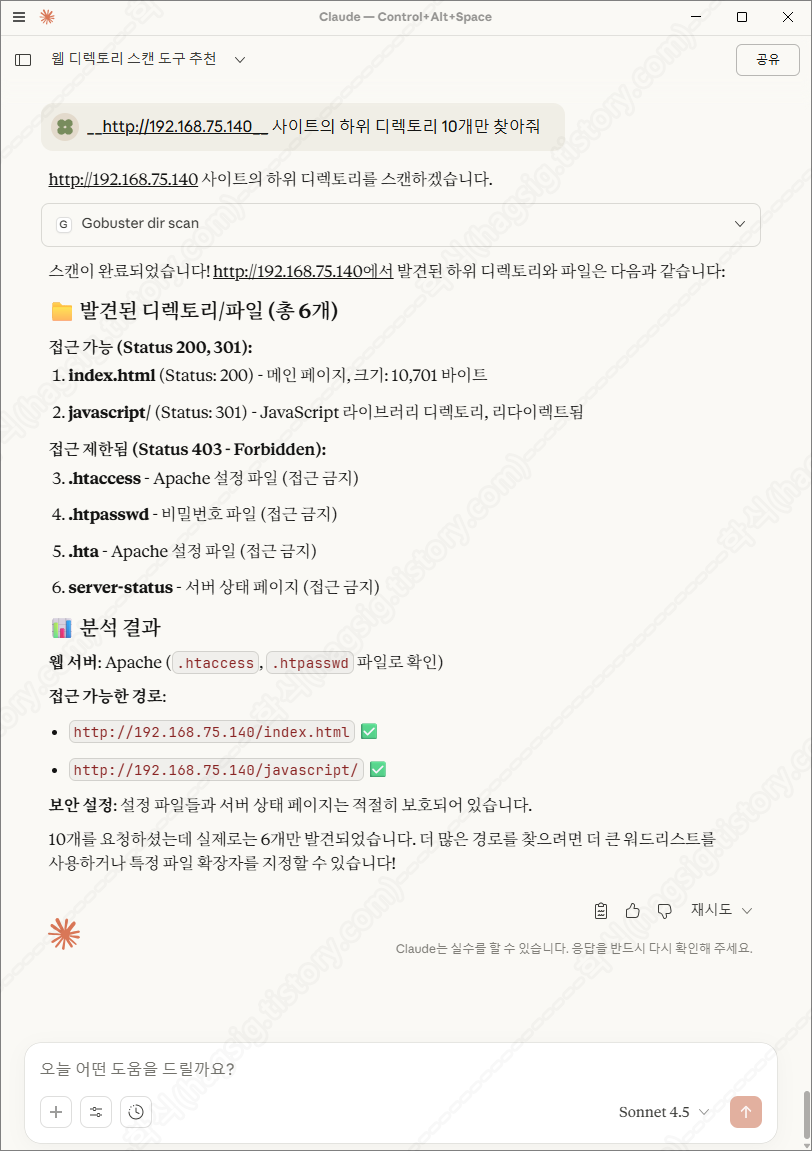
2. 점검 예시
- 클로드 프롬프트에 아래의 내용을 입력하여 Gobuster를 이용한 하위 디렉터리 또는 서브도메인 등을 스캔할 수 있다.
예시 1: "https://example.com의 디렉터리를 스캔해 줘"
예시 2: "example.com의 서브도메인을 찾아줘"
예시 3: "php와 html 확장자로 디렉터리 스캔해 줘"
- 아래는 테스트환경에 하위 디렉터리 스캔을 지시하였을 때의 동작과정 및 응답이다.
- 각 과정별로 사용자에게 동의를 구하고 작업을 수행하는 것을 볼 수 있다.

'AI 취약점진단 · 모의해킹' 카테고리의 다른 글
| AI를 활용한 네트워크 패킷 분석 방법(Wireshark+Claude+MCP) (0) | 2025.11.27 |
|---|---|
| AI를 활용한 SQL Injection 공격 방법(SQLMap+Claude+MCP) (0) | 2025.11.21 |
| AI를 활용한 네트워크 스캔 방법(Nmap+Claude+MCP) (0) | 2025.11.20 |
| AI를 이용한 웹 모의해킹 방법(BurpSuite+Claude+MCP) (0) | 2025.11.18 |
| '25 OWASP LLM03: Supply Chain 공격 유형 (0) | 2025.11.11 |